How To Make a Brass Fireball Wall Hanging

Shortly after I moved into my new house I was thinking about artwork for my walls and all of a sudden I had a vision of a sort of Van Goghesque fireball made out of brass or bronze as a wall hanging. It's been a long time coming, but I finally finished the piece a couple months ago. Here's the process in pictures, along with some Illustrator and CAD files. Feel free to use them to make your own — the design, images and files are all usable under the CC BY-SA 4.0 license.

(This project is also posted at instructables.com.)

Above you can see the finished sculpture, with my hat in the second picture to provide some scale. The three larger pieces are mounted between one and two inches out from the wall, which gives the piece some depth and causes shadows when the morning light hits the wall.

Step 1. First I just scribbled ideas and doodles until I had something that looked right. I must have filled 10 sheets of paper and countless junk-mail envelopes with spirals and whirlpools until I came upon a shape that I felt had the right mixture of chaos and flow.

Step 2. After doing more sketching to refine the idea, I freehanded some construction paper prototypes and pinned them to the wall to see what looked good, how the lines needed to be, etc.

Step 3. Just as I was about to cut the brass with a jigsaw one of my friends at Squid Labs suggested I use their computer-controlled plasma sheet-metal cutter. So I did up one more prototype — this one in Adobe Illustrator. To make the Illustrator version I actually started with a digital photo of my construction-paper prototype as a background image, then layered the Illustrator drawing on top. Using Illustrator instead of doing it freehand allowed me to get much smoother curves, since I was able to just keep removing control points from the splines I used until I had just enough to do what I wanted. Once I had it right I printed one more prototype for my wall, and then wrote out a version that packed all four pieces into a 22" x 33" square, which I exported in DXF format (the file format that the plasma-cutter and most CAD programs use).

Here're the files in DXF format, normal-orientation Illustrator and packed onto a sheet. You can get a free fully-working 30-day trial of Illustrator from Adobe's website, and the latest version includes the ability to export to DXF format.

images copyright metalreference.com

Step 4. Next step was to choose a material. A great site is metalreference.com, which has huge amounts of information on each all the commonly available copper, steel and aluminum alloys, including a full color chart and info cards for each alloy. (They also do some lovely custom metalwork.) I thought about doing the four pieces in colors ranging from red to yellow and even did up a color contact sheet from the images at metalreference.com, but eventually went with 260 Cartridge Brass for all four.

I wound up purchasing two sheets of brass, both from Anvilfire (OnlineMetals.com). The first sheet was 20 gauge (0.032" thick), but after I got it I was afraid would look too thin, so I purchased a second sheet of 14 gauge (0.063"). It turns out the thiner sheet would have worked just fine, but as you'll see shortly I'm very glad I had a backup sheet! The 14 gauge came to $136 for a 22" x 33" sheet.

Step 5. The next step is to go visit a friend how has access to a CAD-powered plasma sheet-metal cutter (in this case, Squid Labs). The cutter kicks up a lot of brass dust, which as you might expect is bad for electronics in the area, so we covered everything in the immediate vicinity with tarps before using it. This especially includes sensitive research equipment like the trampoline.

Step 6. Now the fun part — actually cutting the sheet sheet. We tested it by cutting a small 1" diameter circle from the corner, which worked perfectly, and then let it go to work on the full design. Unfortunately, for some reason when we did the full shape the cutting head went much faster over the sheet, and only managed to cut about a third of the way through (I'm still not sure what went wrong). On top of that, the heat from the arc made the sheet buckle, so there was no hope of going back over the same cuts at a slower setting. We stopped it after the first two shapes were cut outlined, slowed it way down and managed to get the second two pieces mostly cut out, but we were still missing the two thinner parts to the piece.

Luckily, sometimes two wrongs do make a right. Just in case something like this happened, I had brought along the original brass sheet that I decided was too thin. It was a different size so I couldn't fit all four pieces on it, but I was able to cut the first three no problem. And it turns out the difference in thickness is hardly noticeable at all, so all worked out. (Here's a short movie clip of the torch in action on the second sheet.)

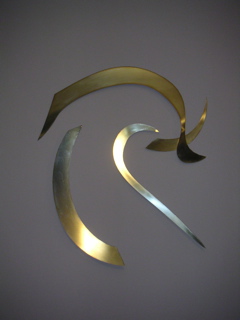
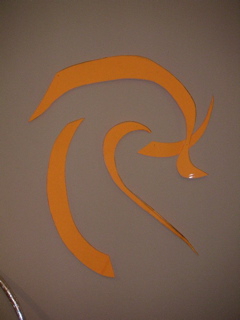
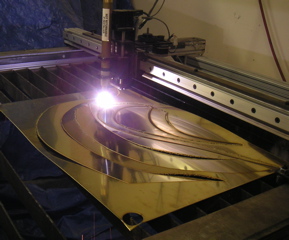
Step 7. The next trick is mounting the pieces to the wall. I wanted some depth and shadow in the piece, so the three larger pieces are actually mounted between one and two inches out from the wall. The downside is that it makes it more likely for people or clothing to catch on the sharp points, which could be dangerous if the piece was rigidly mounted. The solution is for each of the bigger pieces to hang on a single screw sticking out from the wall, like a cheap wire picture hanger. That way if anyone catches on a point the piece it will move with them instead of poking or tearing clothing. This trick only works if some part of the piece is above the center of gravity when hanging in its final position: if the piece is "U" shaped (like the small spur) then no matter where you put the hanger it will flip over.

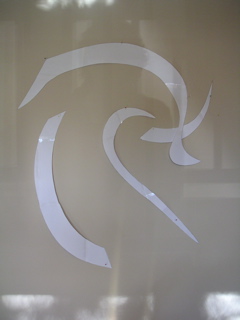
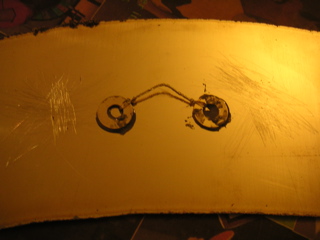
First I found the balance point on each piece that would cause it to 
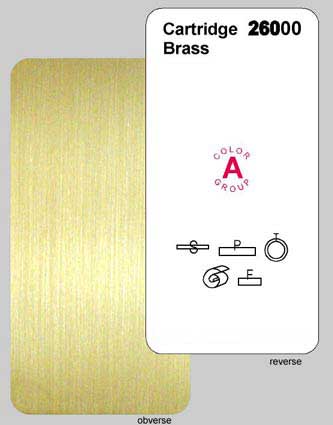
hang at the desired angle. Then I used two brass washers and some thin brass wire to make a wire hanger for each piece. I looped the wire back and forth alternately through the center of each washer, leaving a couple inches between them. Then I twisted the loops to form a single stranded wire. Finally, I glued the washers to the back of each of the three pieces such that the center of the wire was at the center of gravity I'd located 
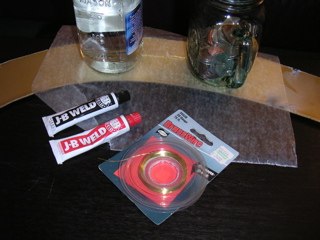
earlier. JB Weld works well as a metal-to-metal adhesive, and is available at most hardware stores.

Then I installed EZ Anchors (available at most hardware stores) into the drywall at the appropriate position, and inserted long #8 brass screws into the anchors such that they poked out at the depth I wanted. Then I just hung each piece like I'd hang a painting, and could adjust a little along their wire hangers to make sure they were all positioned at the right angle.

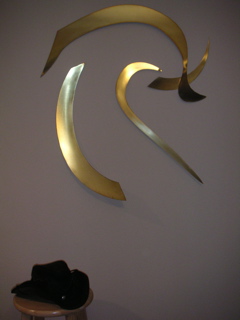
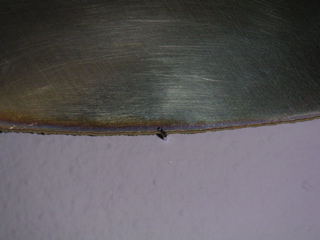
As I mentioned above, the smallest piece didn't have an appropriate place to attach a hanger, but luckily it was both light and intended to be flush with the wall anyway. After briefly experimenting with gluing nails directly to the back of the piece (didn't stick — the heads of the nails didn't have enough surface area) I just stuck two normal sewing pins into the wall so and set the piece on top of them (barely visible in the rightmost picture, above). Then I cut the head of the pin and bent it slightly to make the piece more secure.

Creative Commons License
This work is licensed under a Creative Commons Attribution-ShareAlike 4.0 International License.